When a new Method is created, and the Data File is imported, the Data Map (DM) needs to be created. From then on, the DM can be modified and changed as the development progresses. Each new version is saved in a version controlled system, and can be restored as the current DM from the version history.
On the top tool section in the 'Design your Data Map' subpage, the addition and minus signs can be used to zoom in and out of the DM.
Above this, you can select the type of separator the Data File has. Normally this is a comma, but there are other options.
Step 2: Locate the samples on the wells of the plate map
On the DM screen, select Import a Data File.
Click the Import File and browse or drag your desired file onto the box.
It will upload your data in rows and columns.
Select the pointer icon and to locate your samples - start at the first cell and drag the area the samples cover.
When you've selected a section, a pop up will appear at the top of the page.
Give the sample section a name ('What is this called'), or not if this is unknown. QuBAS will automatically assign a name.
Select on the drop-down menu what type of sample this data selection is.
The colour can be changed by selecting the coloured box.
Click the tick when you've confirmed the information for this sample.
Step 3: repeat Steps 1 and 2 for all the substances on the plate.
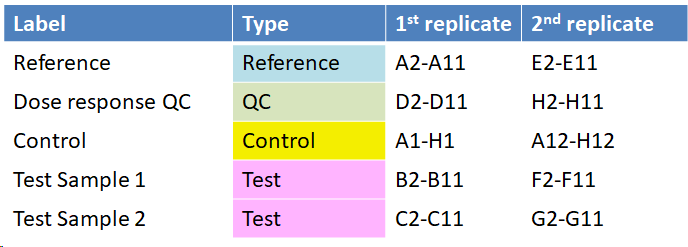
A completed ready to add the dose information map might look like this:
This plate has the following:
To produce a selection of the same sample type, the plus icon can be selected.
Once selected, drag your pointer over the desired section.
Note that not all the placeholder groups need to be used on the Data Map. The groups can be added to the Data Map at a later stage, or removed if no longer needed.
Clicking Save version at any time saves your work to the Method version history. Use this if you plan to stop working on the Data Map and return to it later.
Step 4: Enter the dose information
To set doses to the samples, select on the sample group.
On the pop up section for the specific sample group, click on the pencil icon.
Three icons for setting doses should appear on the right.
Using the dose magic wand to enter a series:
Click on the Dose magic wand button.
The pop up dialogue allows addition, multiplication or division functions. Select as required.
Enter a starting value and step.
e.g. for values 0.5, 1.0, 1.5, 2.0, 2.5, etc, select Additive, Start = 0.5 and Step = 0.5.
For values 0.5, 1.0, 2.0, 4.0, 8.0, 16.0, etc, select Multiplicative, Start = 0.5 and Step = 2.
Using the mouse, drag the magic wand across the identified cells. The doses will be entered on the DM.
To confirm, click the tick on the pop up bar at the top.
**Note it is sometimes easier to enter the doses by using the wizard to enter the same dose across the samples. Use Additive, Start = required dose and Step = 0.
When complete, click Save version to save as a working version. You will be asked to enter a short description of the Data Map.
Entering dose manually for each cell:
Using the table icon: select the cell for which you you wish to enter a dose.
This can be directly typed onto the cell or you can use the up and down arrows.
To confirm, select the tick.
Copying a series of doses:
The conical flask icon allows you to copy a series dilution you've input and paste the same series elsewhere.
Once clicked, select a series to copy by dragging and clicking over a section.
Now copied, the next sections you drag the icon over will paste the dilution series.